Montessori Activities
Empower Your Child’s Independence with Shoe Polishing Activity
As parents, we all desire our children to grow into independent adults capable of taking care of themselves. However, teaching them independence at a young age can be challenging. But, did you know that incorporating simple activities like shoe polishing can help your child become more self-reliant? Not only does this activity teach them a new skill, but it also instills a sense of responsibility and accomplishment within them. In this blog post, we will explore how shoe polishing can empower your child’s independence and why it’s a valuable activity to include in their daily routine.
Shoe Polishing
Suitable Age: 3 1/2+
Materials:
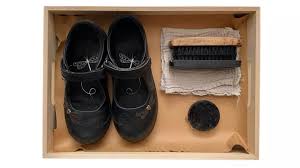
- The tray consists of:
- Neutral-colored shoe polish
- A brush (for removing dust)
- A cloth/towel (for buffing)
- Applicator/brush (toothbrush)
- An apron
- A placemat
- A piece of paper towel for water activities
Direct Aim:
- To polish/clean a shoe
Indirect Aim:
- Refinement of the muscles in the hands and arms
- Concentration
- Hand-eye coordination
- Independence
- Fine and gross motor skills
- Order of sequence
Presentation/ Child instruction:

- Once the child has selected the pair of shoes and taken the pair of shoes to the mat, you will silently indicate to the child where to place the placemat, paper towel, and shoes.
- Show the child where to find the remaining activity on the shelf, invite her to carry the tray to the mat, and show her where to place it. At this point, take out your apron and put it on being sure the child has full visibility of the process. Next, invite her to take out her apron and indicate for her to put it on, allowing her to tie it (if she is able). Invite the child to display the items from the tray in the sequence of the activity, indicating the proper location for each item.
- Begin by removing the dust from the shoe using a small brush. Next, invite the child to open the shoe polish. Pick up the toothbrush and apply some shoe polish to the brush. With one hand holding the shoe on the paper towel (stable hand placed inside the shoe), and the other hand holding the brush, slowly apply the brush to the surface of the shoe, using circular motions begin to apply the polish to the shoe.
- Give the child an opportunity to try the steps you have demonstrated using the other shoe after this step is complete. Once the child has finished, pick up the shoe brush and begin to brush the surface of the shoe. This will allow the polish to circulate evenly. Allow the child to repeat the process using her shoe.
- Next, reach for the cloth, make a mitt, and begin to buff the shoe, in the same manner, using circular motions. Let the child repeat this with her shoes once you are done ( the child should know how to make a mitt from the previous activities). Marvel at the shininess of the shoes that have been polished.
- Invite the child to polish another pair of shoes. If she declines, then invite her to return the shoes back to the basket, take the cloth to the laundry basket, and tidy up the tray. When the child returns she may replace the cloth and return the tray to the shelf. She will also tidy up her mat.
Point of interest:
- The shoe polish, making a mitt, and the shiny shoe
Control of Error:
- Applying too much/too little polish to the shoe
- Missing spots on the shoe
- Forgetting to make a mitt
- Forgetting the sequence
- Forgetting to replace the cloth with a clean one
>> Read more: Empower Your Child’s Independence with Sewing Buttons